Vlocity Facts #03 | OmniStudio - DataRaptor Post
DataRaptor Post Action Overview
DataRaptor Loads convert JSON or XML or Custom data as a input into Salesforce objects. A DataRaptor Load refreshes records with updated data while simultaneously creating new records.
Create a DataRaptor load
For Creating a DataRaptor Load you need to mention Interface Type, Batch Size(optional), Input Type, Output Type, Required Permission (optional), Description (optional)
- Interface should be Load
- Input Type should be either Json for omniscript or XML or Custom
- Output Type should be Sobject.
- Batch Size (optional) it is used to mention the number of records processed per batch transaction (1-2000).

Configure a DataRaptor Post
In DataRaptor Post we are having 5 tabs [ Objects, Formula, Fields, Options, Preview]
Objects - It is used to select the SObjects for which you need to create or update the records
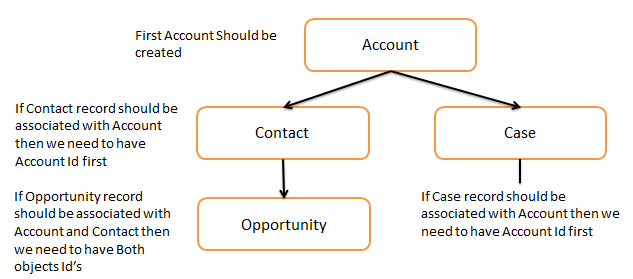
- Data can be propagated straight from one object to another related Object item when loading data into a succession of objects. A DataRaptor Load, for example, It can be used to support an OmniScript that generates an Account and a Contact, Opportunity and Case for that Account.
To handle this type of relationship, link the objects in the DataRaptor Designer as follows:
On the Objects tab, navigate to the source object and click Add Link. For each field you want to link, configure settings as follows:
Formula Tab - We can use formula tab for the following scenarios. - Domain Object Field — The source field from this object. [Child object or any other object]
- Linked Object — Another object in the sequence. [Parent object or any other object]
- Linked Field — The target field in the linked object. [Parent Object field to which you need to map in child object]

Scenarios
- Scenario 1: To combine 2 fields and load the data into particular field.
- Scenario 2: To Calculate the sum of child records and update the value in parent record.
- Scenario 3: We can use If expression - If(%Expression%, true, false), for example, based on age we need to update the category field like Adult, Minor at that time we can use If function.After writing Formula and mentioning the formula result path, you can use Formula result path in Input Json path under Fields tab.

Fields - On the Fields tab, you map data from the DataRaptor Load input JSON to the target Salesforce object and field. You can also handle data types and default values.
For each field, click + and configure these settings:
- Input JSON Path — The key of the JSON node containing the data you want to write to Salesforce.
- Domain Object Field — The field in the sObject that you want to update.
It is a best practice to copy the data json from preview tab in omniscript and paste the data json in Input Json under Field tab.
We can mapping options under Fields tab while we are mapping Input Json path and output Object Fields.
- Is Disabled: If you are not going to use that mapping present but you need in future instead of deleting you can check that box. which makes the mapping of particular field inactive.
- Upsert Key: This is used to prevent creation of duplicate records. It is useful while you are updating the existing records.
- Is Requried for Upsert: While you are updating or creating records this can be used to make that particular field required.
- Is lookup: Uses the field value to query for the specified Salesforce data, and writes the result to the output field. For example, If you need to update the record for particular record type only then you can use this lookup functionality and mention the record type name.
- Output Data Type: The Output Data Type setting must be compatible with the target field in Salesforce.
- Default: If a field in the DataRaptor output JSON is null, this value will be loaded. Enter a pair of double quotes to specify an empty string for null string fields (""). If Is Required for Upsert is enabled, leave it blank.
Options - In options tab we have some Optional properties [ Ignore Errors, Rollback on Error, Use Assignment Rules, Overwrite Target For All Null Inputs] . Why we will use this options, we can discuss these topics in upcoming posts.
Preview - This Preview tab can be used to check the excepted output by passing the Key/Value pair or Json. We can also check the error in Debug logs if Dataraptor fails.
Scenario for DataRaptor Post Action:
ABC Company Service Center Employees need to access the case details and associated contact details of the case and update the case details from OmniScript.
For this requirement we need to build 2 Integration Procedures, 2 DataRaptors and 1 OmniScript.
- DataRaptor Turbo Extract : To get the data of the case and associated contact details.
- DataRaptor Load : To Update the Case Details.
- Integration Procedure: In Integration procedure we will use DataRaptor Actions.
- OmniScript : To display the case and contact details.
Now we will discuss how to create a DataRaptor Post and Update data in OmniScript.
After creating Data Raptor Post by providing name and choosing the interface type and input and output type, Next we need to choose the Case the object under Objects tab.  Next we need to Map the fields from json to Domain Object. It is best practice to copy the json from omniscript and waste in inputjson under Input Tab.

Like this you can copy and by using Quick match button you can map the fields.
Like this you can copy and by using Quick match button you can map the fields.
According to the scenario i need to update the existing case details and I'm not supposed to create a new record. Now to sort this we can use Upsert key and Is Required for Upsert for Id field mapping.

After this Check the DataRaptor in preview tab by providing key/value or Json. Here I have attached the screenshots before/after executing the DataRaptor Post.

Now create new Integration procedure, Drag and drop the Dataraptor Post action into canvas and select the DataRaptor Load what you have created now.

After Creating Integration Procedure now drag and drop the Integration procedure action on omniscript.
and select the newly created Integration procedure.

You can test the full scenario from preview by passing the context Id.
Before Updating the subject.
 After Updating the Subject.

For more Details about DataRaptors and Types check this link DataRaptors


After Creating Integration Procedure now drag and drop the Integration procedure action on omniscript.
and select the newly created Integration procedure.
You can test the full scenario from preview by passing the context Id.
Before Updating the subject.
For more Details about DataRaptors and Types check this link DataRaptors


Comments
Post a Comment